Index
In order to activate USB 3.0 quickly insert the USB stick into the port
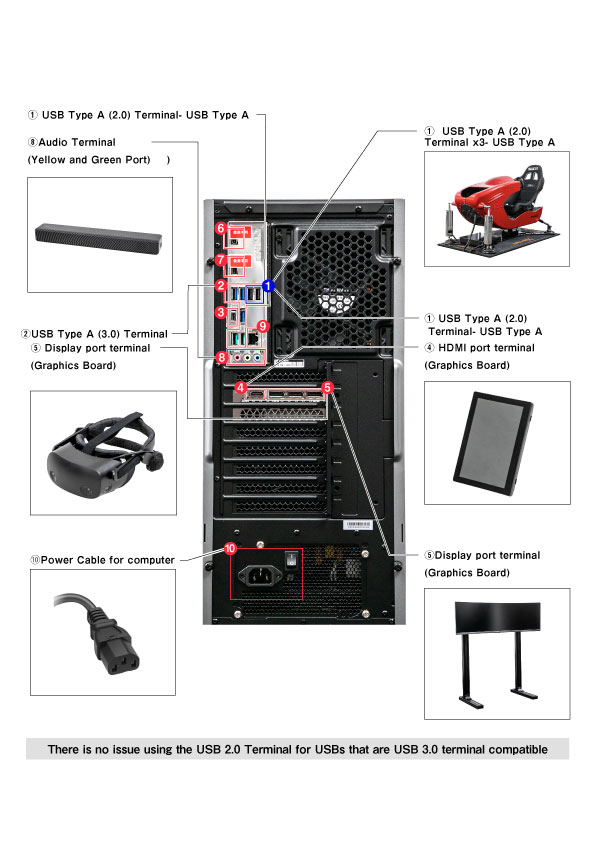
Electrical Diagram
Rear of PC
1.USB Type A (2.0) Terminal
2.USB Type A (3.0) Terminal
3.USB Type C Terminal
4.HDMI port terminal (Graphics Board)
5.Display port terminal (Graphics Board)
6.HDMI port that is not in use
7.Display port terminal that is not in use
8.Audio Terminal
9.LAN Terminal
10.Power Cable for computer
Front of PC
1.USB Type A (2.0) Terminal
SETUP
1.Connecting the power strip
Make sure the power strip is turned off before connecting it into a household power outlet that is capable of handling 100v/1500w
2.Connecting the computer
After you have plugged the power strip into an outlet, check the back side of the computer to make sure the switch is on the (ー)and not on the (◯) position
3.Connecting the Monitor
In order to use the monitor please connect the DisplayPort cable from the monitor to the DisplayPort outlet installed on the graphics board on the backside of the computer. Keep in mind unlike an HDMI cable the DisplayPort cable will be (D) shaped.
*PLEASE NOTE* When plugging the cable to the computer, make sure to connect it to the graphics board DisplayPort outlet as opposed to the computer itself.
4.Setting up the Speaker
Please start by connecting the power cord into the strip
Connect the power source into the back of the speaker including the audio USB cable
Connect the Audio USB cable into the audio converter output side and the Micro USB which will power the Converter
Connect the mini 3.5mm Audio Jack into the back of the computer and the other end to the Input side of the converter
The final look should have two cables coming from the output side (USB and Micro USB for power) and one cable from the input side (3.5mm Audio Jack)
5.Touch Panel Setup (Option Item)
In order to set up the Touch Panel please make sure you have the necessary cables ready
- HDMI cable
- mini USB Type B to USB 2.0 cable
Please connect the mini USB Type B and HDMI cable into the back of the touch panel
Connect the USB and HDMI cable into the back of the computer
Same as the monitor, please plug the HDMI cable into the graphics board
6.VR Head Mount Display Setup (Option Item)
Check to make sure you have these necessary items
– VR power source
– VR DisplayPort and USB Type C cable (If your computer does not have an USB C outlet, please use the converter provided inside the box)
Connect the power source into the power strip
Connect the VR DisplayPort and USB Type C cables into the computer
– Same as before, please connect the DisplayPort into the graphic board in order to have an optimal experience
Final Note
- On the back of the computer, there will be different colored USB ports
– Blue Colored Ports are USB 3.0 - In order to activate USB 3.0 please plug the USB driver into the port quickly to activate its feature